|
nForce 2 Overclocking - Level One
|
| By Richard Jackson "ricjax99" |
| |
| |
| |
|
Overclocking
|
| |
|
If you've been working with or building PC’s for any length of time, you've probably heard the term overclocking
before. A lot of peoples perception of overclocking is it sounds dangerous, requires massive amounts of skill,
dedication and an unlimited supply of cash. Wrong! At its most basic level, overclocking is merely running a computer
faster than the manufacturer originally intended. It does require a bit of knowledge and familiarity with your computer
but this guide should be enough should be enough to get you some free MHz that were not there before.
|
| |
|
The guide is based around the nForce 2, although a lot will apply to other systems as a lot of the settings are generic
and can be found on the majority of motherboards. However, this guide is solely based on AMD systems and where the guide
covers things that do apply to overclocking Intel based system, if you have such a system use it as information not a
guide.
|
| |
|
This guide has been broken down into different levels, which I will add as and when. Level 1 is simply multiplier
and/or FSB overclocking to their maximum stable level. Level 2 includes tweaking of more advanced settings, such as
memory timings, AGP settings and Advanced chipset features etc. and level 3 involves more risky changes such as
increasing voltages to major components and the importance of greater levels of system cooling.
|
| |
 |
| |
|
As you read on you may wonder why I’m covering multiplier overclocking as from manufacture week 40 AMD Athlon XP
processors come with a locked multiplier. Well, the reason is vast majorities have AMD CPU’s with a fully unlocked
multiplier, and some of those that come locked can be unlocked various different methods. The fact is multiplier
adjustment can give massive performance boosts, on systems where it's possible, multiplier overclocking can be a
very useful indeed.
|
| |
|
Possible Limitations
|
| |
|
When a manufacturer designs and builds a component, whether it's a processor, motherboard, RAM, graphics card etc, it
is built with a specific set of operating conditions in mind. If the component functions normally under those
conditions, it is a "good" part. However, the ability to function beyond those specifications can vary widely.
Because of this, initial overclocking is a in most cases down to luck. For example, some Athlon XP2500+ CPU’s can
reach in excess of 2.4GHz when their default clock speed is just a mere 1.83GHz, on the flip side it is not unusual
to find many that struggle to hit 2.0GHz. It really is pure hit and miss.
|
| |
|
Potential Problems
|
| |
|
Overclocking increases stress on the system, and when taken to extremes, can result in the loss of stability or even
component failure. However, when overclocking is done in moderation, the increase in stress reduces, and likely to cause
little, if any problems. At higher levels, these conditions become more problematic, however, even then there are steps
that can be taken to ensure your system still runs reliably. |
| |
|
There are time when you may push your system a little too far but if you follow my guidelines on stability and testing
methodology then this is very unlikely. The way this guide is structured ensures you don't corrupt a hard drive on your
first attempt, basically it takes you up in small steps. This is by far the best way as jumping straight in the deep
end before you can swim is the best way off putting it |
| |
|
If you do ever come to a point where your machine refuses to post there are certain ways of getting out of such problems.
Bios settings are retained in the motherboards CMOS, if you clear the CMOS the bios settings are set to defaults. This is
done by changing a jumper position on the board or simply by removing the CMOS battery for a minute. Details on exactly
how do this can be found in your motherboard manual.
|
| |
|
Requirements
|
| |
|
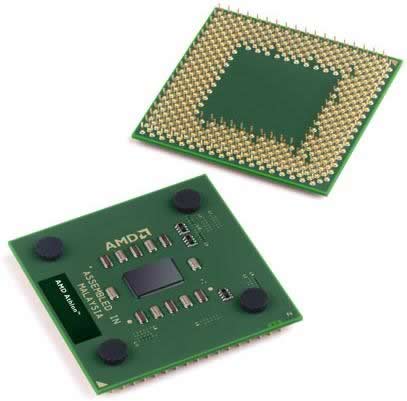
CPU Cooling - This guide can be followed with Air/Water cooling and obviously Better.If you’re using air-cooling I’d
recommend investing a decent heatsink, just go straight for the best if you can. I can personally highly recommend the
Thermalright SLK900U and a 92mm fan as a good option.
|
| |
 |
| |
|
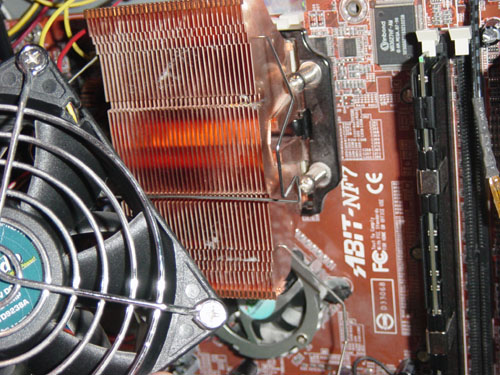
Chipset Cooling - Well to be fair most nforce2 ultra boards don’t run as hot as the earlier nForce 2 boards so this
is not something to really worry about however, there are some steps you can take if you prefer to improve on it. The easiest
and by far the cheapest way is to re apply a decent TIM (themal interface material/Compound) to the northbridge. A standard
board often comes with very poorly applied white goop. I’d recommend cleaning it off and applying a decent compound,
preferably arctic silver. As far as getting a better cooler its totally up to you, in my opinion stock cooling is plenty good
enough for starters. Information on how to do this can be found at
http://www.motherboardfaqs.com.
However, if your board has just a passive heatsink, a fan blowing in that area would be a very welcome addition.
|
| |
|
System Cooling - I’d really recommend you ensure you have good airflow in the case. If your average system temperature is
above 30*C under load (depending on your ambient room temperature) then you need to rethink your air-flow, make sure you have the
same amount of air blowing out as well as in. A side fan, be on a PCI bracket or an actual blowhole helps to an extent by reducing
graphics card temperature and thus overall system temperature.
|
| |
| |
| Power requirements: |
| |
| Ok power, very important issues here so listen carefully. |
| |
|
A lot depends on the quality of the psu the way it’s rated and the amperage it supply’s. For example PC Power and cooling
rate their psu's overall power output at 40*C operating conditions, Enermax rate them at 25*C so its hard to make a
comparison wattage to wattage as psu's perform better the colder they are. Therefore the wattage rating becomes meaningless.
|
| |
|
Have a look at this pdf to understand what I mean:
http://www.pcpowerandcooling.com/pdf/Turbo-Cool_510_vs.pdf
|
| |
|
Basically at 40*C the PC Power and cooling can supply 510W the other can only produce 366W see the difference? Some
manufacturers even rate thier PSU's at 0*C which is truly ridiculous. On newegg.com's site (USA) they show something
like: "MTBF: 100K hours at 25şC" this means the maximum power output is rated to work for 100,000 hours at 25*C. Some
are not specified which makes me wary (thermaltake/qtec doesnt give info btw).
|
| |
|
So in a nutshell a 550W is not essentially a 550W PSU, if in your room it operates at 50*C it could only be supplying
you with as low as 244W!!!!!!.
|
| |
| Take these two as an example: |
| |
|
Enermax EG365P-VE(FC). 350W Power supply
|
| |
| @$51.00 |
| Maximum Power: 350W |
| Output: |
| +3.3V@32A |
| +5V@32A |
| +12V@26A |
| |
|
Thermaltake Silent PurePower, 420W ATX power supply
|
| |
| @$49.00 |
| Maximum Power: 420W |
| Output: |
| +3.3V@30A |
| +5V@40A |
| +12V@18A |
| |
|
The Enermax has a slightly stronger +3.3v rail, which helps ram voltage stability and the +12v/5+ helps when using
high-powered CPU’s. However the motherboard uses a combination of the +5v and +3.3 so the 40A on the thermaltake will
help but it just shows the true difference in the psu's, the large gap in power output means very little.
|
| |
 |
| |
|
Having personal experience with Enermax (I use a 460W Enermax) I’m pleased with it, copes with every thing I’ve thrown at
it so far it has 35A amps on the +5V and 35A on the +3.3v it holds up at high overclock’s very well. The +5v rail is rock
solid at 5.03volts under load. The +3.3v rail is often above 3.34v under load at increase system voltage levels.
|
| |
| |
|
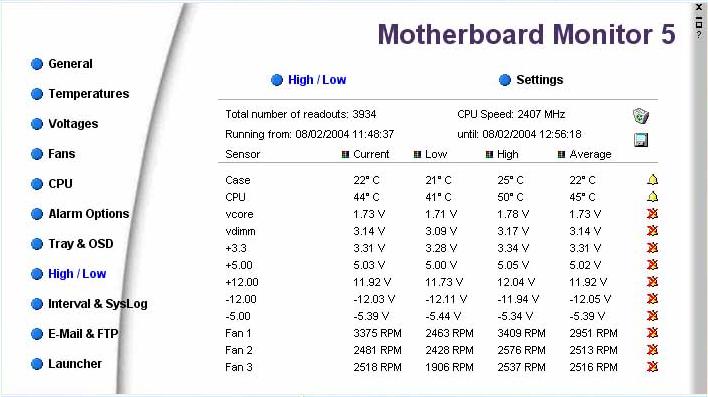
Heres an example of the kind of rails you want to be seeing for this guide.
|
| |
| Under full load: |
| |
| 3.3v = anywhere between 3.25~3.40v |
| 12v = anywhere between 11.85~12.35v |
| 5v = anywhere between 4.97 ~5.1v. |
| |
 |
| |
|
You can check these using a program like motherboard monitor (shown above), or any hardware monitoring tool your board came with.
However, the H/W monitor on the NF7 is dreadful and way out on vdimm/+3.3v readings
|
| |
|
When I say anywhere between i mean a constant number anywhere in that range of values. One big problem is fluctuations, if
for example the +3.3v rail jumps from 3.25 to 3.35 every single second, this can affect your systems stability.
|
| |